Chapter IIWET FEET & LOOSE STONESA look a Drainage and Erosion ControlThe preceding chapter outlined the basic responsibilities of the trail adopter and therefore, you are armed with all the knowledge and wisdom you need, right? Wrong! Yes, the job of the adopter is to keep the trail clear for enjoyable and safe passage, and no, we do not expect you to build waterbars and dig ditches; but you are the one person that visits the trail on a regular basis. You are the one that sinks to your knees in the mud hole. You are the one that gets caught in the torrential downpour and witnesses fist sized stones being swept down the trail. We need you to be our eyes and ears. The Trails Committee tries to have at least one member on each trail every year. To be honest, we have never succeeded. It is up to you to let us know what is happening on your trail. This chapter and the next two chapters provide a concise look at some of the perennial concerns that we, as trail tenders, all must address. We hope that after digesting this information you will look at your trail from a new perspective that will help you identify problems before they become severe and understand the ramifications of all trail activities, be it usage or maintenance.
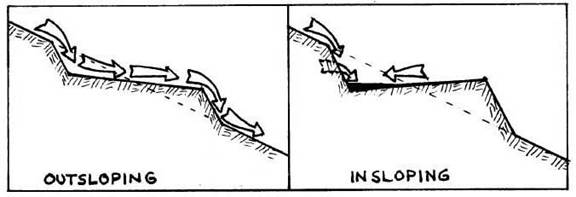
WATER IS BADActually, it is our feet that are the culprits. It is the continued treading that allows the water to collect on the trail, but since we are not about to turn in our hiking boots and sprout wings let's assign the blame to water. Water is bad. Moving water takes the soil with it and creates gullies. Standing water deposits silt and sand, resulting in mud holes. From the moment a trail is created the process starts. The hikers arrive, the plants are trampled and die. The now dead roots and forest duff are ground into flour and the soil becomes unstable and compacted. An ever so slight depression is formed and then the water begins its dirty deed. Sheet runoff, best described as uncontained flowing surface water that appears after rain storms, is intercepted by the depression, and ground water close to the surface springs from the edges as the treadway slowly sinks. On trails with a considerable slope the water flows down the trail, scouring and eroding the surface and ultimately resulting in a gully. In level areas and natural concavities the water collects along with fine soil particles and organic debris, giving birth to the classic mud hole. In theory the solution is simple: get the water off the trail. More important, remove the water at its source, before it can inflict any damage. When drainage and erosion control is considered during the planning stage the task is relatively easy. Proper trail design eliminates the need' for many drainage structures and facilitates the construction of those that are required. When the problem isn't addressed until decades after trail construction the task becomes monumental. Unfortunately for us, WODC trails fall into the later category. Our long and rich history of trail building has left us with an undesirable legacy of abused and tortured trails. The fault lies not with our predecessors but rather with their historical placement and, of course, the unprecedented rise in popularity of back country recreation that began in the 1970's. So now we are not only faced with the task of removing water to prevent trail damage, but also we must deal with those areas that are so deeply scoured it is virtually impossible to remove the water by using conventional means. When faced with this additional dilemma we are tempted to throw up our hands in total frustration, abandon the mutilated section and relocate the trail to new ground. In some cases this may be the best solution, but we have an ethical responsibility to deal with our mistakes in a more direct manner. Our actions should be those of stewards, not exploiters. Generally, relocations should be avoided for two reasons. First, relocating the trail does nothing to address the damage caused on the original path. Often times once the water has scoured out a route it will continue to do damage even after the trail has been abandoned. Second, alternative trail routes in the same area are likely to pose the same problems. If the trail can be moved to a site where soil and slope conditions are more suitable, then fine. But moving a trail from one delicate area to another is counter- productive. Over the years the role of trail workers has changed dramatically. We are no longer the tamers of wilderness, but its protectors. Nowhere else is this new role more evident than in the job of drainage and erosion control. REMOVING THE WATERWhen dealing with water removal it is always important to remember two things. First, it is best to remove water at the source. Find where the water is coming onto the trail and provide a route of egress at that point or the nearest downhill site that is practical. Second, the simplest solution is the best solution. The ultimate simple solution is to have a treadway that will shed water on its own. This is called outsloping and is most commonly used on trails that are slabbing across or diagonally up a slope. It is most effective on relatively dry soils and will shed any sheet runoff originating above the trail. Outsloping is accomplished by sidehill grubbing (digging into the upslope side of the treadway and pulling. the loosened material down) and grading the treadway to slope towards the downhill side sufficiently to allow water to drain off the trail rather than down the trail. A word of warning; the steeper the hillside, the less stable the treadway. In extremely steep situations retaining walls or cribbing would be required. On hillsides having wetter soils, insloping will sometimes work. As the name implies, this is simply out- sloping done in reverse. Instead of shedding water across the trail, it collects water on the uphill side. This will usually provide a dry treadway but we are still stuck with the problem of removing the water before it causes erosion.
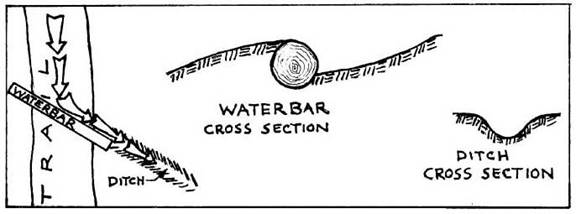
Insloping has to be employed either above a natural water shedding site on the trail or in conjunction with some other drainage device, which complicates matters. It also causes hikers to walk on the downhill side of the trail which may lead to further wear and erosion problems. It should only be used when sidehill seepage is heavy and frequent enough to render outsloping ineffective. Interceptor Ditches are a variation of insloping. A well defined ditch is dug on the uphill side of the trail to collect runoff and seepage. This allows a flat or outsloping treadway but still requires other provisions to ultimately remove the water. Waterbars are probably the most recognized means of coaxing water off the trail because they are the most visible. The idea is simple and effective as long as a handful of rules are followed. The waterbar should extend beyond both edges of the trail and be angled at 30 to 45 degrees (referenced to perpendicular to the trail). It should be sloped enough to keep the water from depositing any debris without scouring out the bottom of the bar. The ditch extending from the end of the bar should be long enough to ensure the water does not return to the trail and should have a cross section shaped like a low amplitude sine wave (well rounded edges and bottom, and wider than it is deep). On steep slopes it is good to have a step above the water bar to slow velocity and one or more steps below to stabilize the treadway.
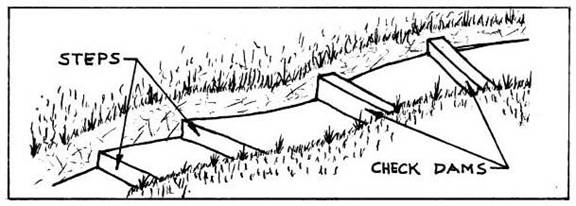
If you take an inventory of all the waterbars on your trail you will probably notice that many have at least one deficiency. For some this may be due to poor construction or maintenance but for most it is simply because site constraints limited what could be done. The result is less than perfect but should be the best possible solution for that situation. What really counts is how effectively the waterbar removes runoff from the trail and how well it encourages hikers to stay on the treadway. The latter is easy to discern. Where do you want to step when passing the bar? If you pass directly over it everything is fine. If you tend to go around it or over one end we have a problem, because the wear and tear of foot traffic will eventually provide a route for the water to bypass the bar. Determining a waterbar's runoff removal ability takes a little more study. The most conclusive means involves getting ourselves soaked in the process, and while it pays to take advantage of coincidental occurrences none of us (OK, maybe a couple of nuts) are willing to head for the hills at the first sound of thunder. However, a good "dry run", if you will, involves the use of a golf ball. After arriving at the test site and carefully looking and listening to be sure no hikers will witness your lunacy, release the ball on the lowest part of the treadway about five feet uphill from the waterbar. If everything is perfect the ball will travel at a moderate speed and with minimal bouncing down the trail, along the face of the waterbar and a considerable distance into the ditch. If the ball stops anywhere before reaching the ditch there either isn't enough slope or there are too many obstacles. If, on the other hand, the ball ricochets around like a pinball and/or goes careening out of sight down the trail we also have a problem. The golf ball test is only useful on a freshly cleaned and groomed waterbar (a topic to be discussed later), and even then it has a limited usefulness, but we hope it will help you visualize the mechanics of a well designed and maintained waterbar. On more moderate slopes earth bars , drainage dips or swa1es can be substituted for waterbars. These devices are built similarly to waterbars but do not have the log or rock bar. Instead, earth removed to create the dip is used to build a berm directly down slope. The advantages of this method are speed and low impact, both visually and environmentally. A big disadvantage is the susceptibility of the berm to erosion from both traffic and water, requiring a large amount of maintenance. Cu1verts , switchbacks and reverse grades are other methods used for drainage and erosion control but since they require consideration during the planning stage you are unlikely to see many of these on WODC trails. Suffice it to say they exist as options to the trail worker. DEALING WITH OUR MISTAKESSo we have all our drainage structures in place and working well. The water is off the trail and the hikers are staying on the treadway. Now, what are we going to do about the yawning chasms on upper Walden Trail? How do we deal with the hundred feet of muck on Kate Sleeper Trail? We owe it to the forest, to the memory of the people for whom these trails are named and to ourselves to address these problems. Deep gullies pose the biggest problem. They form on steep slopes where the trail goes straight up; a difficult situation for preventive measures, never mind attempts at reconstruction. Even with a drainage device at the head of the gully we will still have water coming in during storms. The best we can do is try to control the flow (velocity and location) and provide a treadway acceptable to the hiker that will at least stop the erosion, if not reverse the process. Steps are the most common means of stabilizing gullies. They retard both water and traffic erosion by placing immovable objects in the path. They are quite effective in smaller gullies and are the next best thing to filling and hardening back to the original grade. More effective than steps but less well received by hikers are check dams . These are basically steps whose tops are above the treadway. They slow the water, allowing the soil to settle out, and if properly installed will eventually fill in and serve as steps. If enough soil is being carried down the trail, successive check dams can be added over a period of time until eventually the treadway is brought back to original grade.
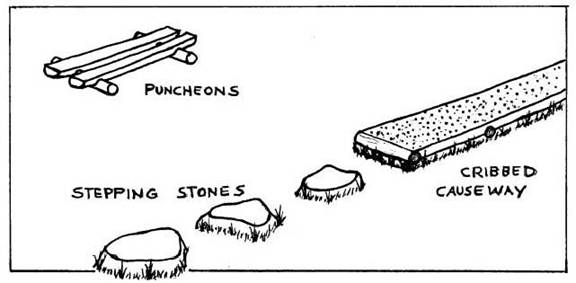
We must remember though, that this soil is coming from somewhere else. There is a tradeoff here that should be carefully considered, but if soil is being carried by the runoff anyway, we might as well take advantage of it. There are some places on WODC trails where we just can't get rid of the water. The treadway has sunk below the water table and no amount of ditching will remove it. These places are where mud holes are born and the only option, short of relocation, is to build a raised, hardened treadway . The traditional method of dealing with this problem has been puncheons, log bridges with cross members that rest in the muck. Puncheons have gone out of vogue recently for a number of reasons, mainly because they have a limited life span and require almost as much work as more permanent measures. Add the fact that they give an artificial man- made look to the trail and you can see why many people would rather not see them in wilderness. Besides suffering all the drawbacks of puncheons, corduroy also gives poor, slippery footing and requires an inordinate amount of raw material compared to the surface area covered. This method has not been extensively used in recent times except for vehicular access. Stepping stones are the quickest fix and do an excellent job on short sections of wet trail. Hikers will try to avoid them unless they are properly spaced, large enough to have a solid, stable look and provide an ample flat surface for stepping. Causeways, turnpikes and hardening are all variations of the more ambitious method of reestablishing an entire treadway. They are often built in conjunction with ditches, cribbing, open culverts and whatever else is deemed necessary to provide a solid path while allowing for any drainage available for controlling water level. These methods can in the truest sense be called trail reconstruction. They require a large amount of time and material but in many cases are the best means of correcting trail problems.
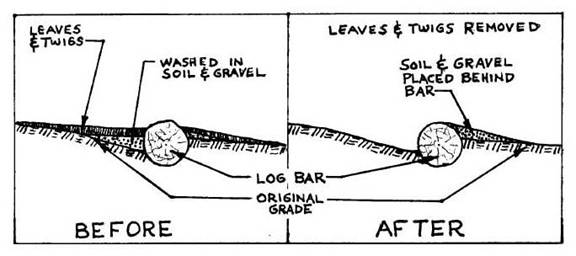
MAINTENANCE: WHO DOES IT?The quintessential waterbar is a rare, almost mystical object. It not only efficiently removes runoff but cleans itself in the process. This rarity is most readily recognized in the field by the imprints of knees where pilgrim trail tenders have knelt to revere its glory. But alas, the other 99.9% require periodic grooming to insure continued performance. Without this maintenance, the waterbars will eventually fill in with soil and organic debris which will eliminate their usefulness, sometimes causing them to resemble steps. You may want to closely examine the next "step" you see. Could it be a long forgotten and neglected waterbar? In the past the WODC has expected trail adopters to assume the responsibility of cleaning waterbars. While the Trails Committee supports and welcomes the initiative of any adopter who is willing to take on this task, we realize that in some cases it is a monumental job. We have trails that possess up to 200 waterbars which collectively require as much as 50 person hours a year to maintain. This is more than the total commitment the average adopter is willing to make. It has become apparent to the Trails Committee that other means must be employed to meet this responsibility. We currently schedule work trips on trails that have the heaviest concentration of waterbars and are seeking volunteers who are willing to act as "Waterbar Adopters". In the future we may have to hire out this job. We do ask that you become aware of the drainage structures on your trail and monitor them closely. By using the work trip reports you can keep us informed of where the greatest needs are. If you see a particularly ominous problem take a minute or two to clean out the worst of it and let us know about it. For those of you who are able and willing to tend to the waterbars on your trail, we offer the following guidelines. HOW TO CLEAN A WATER BARA waterbar in need of cleaning usually has a mix of soil and plant matter deposited in the drainage way. First, rake the organic debris out of the waterbar, the ditch and about three to five feet up the trail. Make sure these leaves and twigs are placed where they won't interfere with any flowing water, keeping in mind that any material placed directly uphill of the drainage will eventually end up in the way again. After the plant matter has been removed, the soil and gravel that has settled in the drainage way should be dragged over the bar and onto the trail directly below the bar, thus building up the berm behind the waterbar. This helps stabilize the log or rocks and as a side benefit, reduces the chance of hikers tripping over the bar.
Make sure that you don't dig down below the original excavation unless you are sure it will improve the drainage performance. On log bars, 1/4 to 1/3 of the log should remain below grade on the uphill side. On a truly well built rock bar, the majority of the rock should be below grade. Unless you participated in its construction you can have no idea how deep it is. Proceed on faith and assume that the original excavation is correct. Now it is time to fine tune the drainage way. Cut and remove any new root growth so that none can catch any floating debris or slow the water flow. Remove any other obstacles, such as rocks. Grade the sides of the outflow ditch to a moderate slope and round the top edges and bottom of the ditch. This will help prevent the ditch walls from sloughing off and clogging the ditch. Rake everything smooth and you are done. When cleaning large numbers of waterbars, the most efficient means is a two person crew armed with a fire rake, shovel and hoe (hazel or grape). A crew such as this can clean 30 to 50 waterbars a day, depending on hiking distance and the condition of the waterbars. When working alone and/or doing just a few bars, any wide bladed digging tool will work, the grape hoe probably being the best. Continue to Chapter III
|