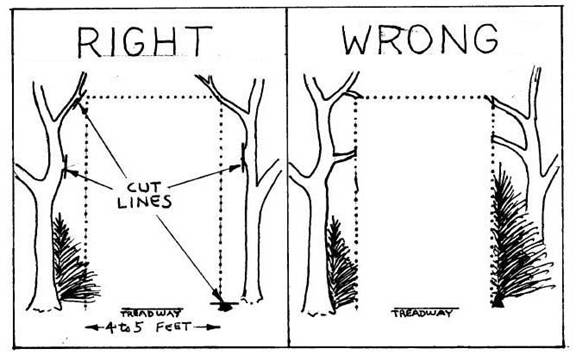
Chapter ICLEARING THINGS UPBRUSHING AND BLOWDOWN REMOVALThe primary responsibility of the WODC trail adopter is to maintain a pathway that provides an obvious and practical route for the hiker. This task should be performed with an eye toward aesthetics and conservation. No easy task! Theory and individual opinion could bog us down before we set foot on the trail. How wide should we clear? How high? How often? Should this tree be pruned or removed? Should we even be clearing trails in Wilderness? These questions and countless others have been asked of and by the trail gurus and in many cases consensus eludes us. Nevertheless, the following guidelines are offered in an effort to standardize WODC trail maintenance and provide to the hiker a suitable and attractive route. BRUSHINGIn general, WODC trails should be cleared so that a large person with a full frame pack can walk the trail after a rain storm without getting soaked. Allowing for regrowth between brushing sessions, the recommended width is four or five feet with a height of eight feet. If the trail is used frequently in the winter, the adopter has the option of clearing higher to allow for snow cover. A five foot width may seem extreme but when put into practice it will guarantee an adequate path for at least a year. Plants and their branches are very adept at finding and occupying open spaces. A two or three foot wide clearing will fill up quickly. Branchless tree trunks are allowed within this clearing width as long as the hiker does not have a hard time squeezing between them. In fact, these larger trees will help shade the trail and retard understory growth. The intent is not to have a five foot wide treadway (the surface area of ground that is actually walked on) but to keep that area clear for the entire period between brushing sessions. In most cases the treadway will remain at about 18 to 24 inches in width. Exceptions occur when a trail is very heavily used or when erosion and drainage problems exist. Plants that are entirely removed should be cut flush with the ground. Branches should be cut flush with the trunk or limb from which they are removed. This results in a natural appearance and eliminates potential hazards to the hiker. Try to avoid over-pruning trees and never remove the top. This is not only unsightly but also encourages lateral growth which increases your later work and produces an even uglier tree. N.H. Parks Department suggests that not more than one third of a tree's branches be removed. Sometimes removing one third of the branches is not enough to provide a proper clearing. In this case it is best to remove the entire tree. In fact, many adopters have. come to the conclusion that if a small sapling needs pruning the best course of action is to remove it because it will present problems later on.
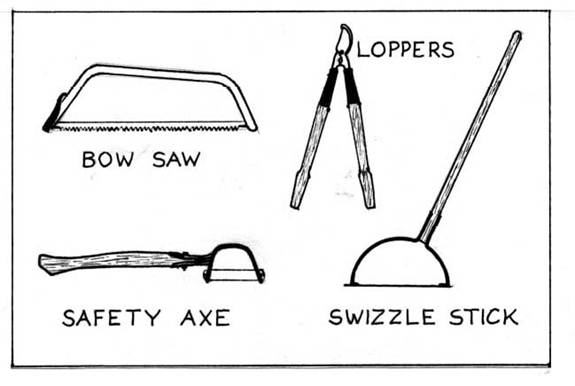
Unfortunately, the same respect for nature and stewardship ethic that led us to become trail maintainers sometimes prevent us from doing a thorough job. Trail clearing is not for the squeamish. If a tree is a hindrance it must go. SPECIAL CONSIDERATIONSGood brushing practices not only facilitate unimpeded passage but also help guide the hiker along the trail. Signs and blazes should be kept clear of any growth that obstructs visibility. The adopter should remember that heavy brushing will sometimes open up alternative routes, resulting in multiple treadways. If this situation cannot be avoided by judicious brushing, the less desirable routes should be blocked by placing downed limbs or logs to keep hikers on the intended treadway. This practice is commonly called "brushing in". At some point, most WODC trails slab along the side of a hill. Hikers have a tendency to walk on the downhill side of the trail, probably because the lower (relatively) vegetation provides a more inviting route and better view. The result is an almost imperceptible but steady downhill migration of the treadway, which is intensified when an unwary trail brusher concentrates mostly on the lower side of the trail. When this occurs on a graded route such as an old logging road, the treadway often ends up on the very edge of the bank, which can lead to erosion problems. There are. even cases where this downhill movement has resulted in the trail ending up in the outflow ditches that carry water away from the trail. Observe Dicey's Mill Trail to see examples of this. By keeping aware of the terrain and favoring one side of the trail while brushing, usually the uphill side, the adopter can help guide foot travel toward the most stable route. Another problem many adopters face is hobble bush. When this weed overtakes a trail it can drive the most dedicated adopter to tears. Annual sessions with loppers are no match for this fast growing invasive plant. The solution is an intensive brushing session with a large crew. If your trail is inundated with this weed, perhaps you should contact the Trails Committee for help. After the hobble bush has been cut back to a width of five feet, annual sessions with a swizzle stick will keep the weed in check. The trick is to stay ahead of it. As long as you are working with year old growth, the swizzle stick will work fine. The extent of brushing and tree removal should be limited to providing a clear path. View clearing is not allowed in federally designated Wilderness areas nor is it endorsed by the club. We have permission from the land owners to clear only the trails. BLOWDOWNSThere is some debate over when a blowdown should be removed, especially in Wilderness. Some adopters believe all dead wood should be removed while others think that only those blowdowns that significantly impede passage need to be removed. The decision is yours as long as the following considerations are given. Any fallen or leaning wood that requires the hiker to crawl under or climb over should be removed. This not only facilitates travel but also lessens the likelihood of bootleg relocations. Most people confronted with an obstacle will search for a route around it. On a well used trail it is only a matter of weeks before a new route is established. The sooner a blowdown is removed, the less damage is done to the surrounding area. It is best to remove as much of a blowdown as possible. The goal should be not only to clear the path for travel but also to retain a natural appearance. Sawed ends of logs protruding into the trail detract from the wilderness experience and can also impede future brushing efforts. If the tree is small enough, it can be dragged off the trail butt first or cut in sections and removed. Larger trees usually require two or more cuts to remove the section blocking the trail. Cut this section as large as possible to lessen the visual impact of the remaining pieces. Some large blowdowns that fall nearly parallel to the trail are best moved by rolling or shifting with pry bars. . You would be amazed at the size of a tree that can be moved this way. If you have such a monster on your trail, contact the Trails Committee for help. After the path has been cleared, be sure to check for and remove any branches extending into the trail clearing. Protruding broken branches can cause serious injury; to hikers. TOOLSPersonal preferences not withstanding, there are a few tools that can be deemed essential for trail clearing and others that should be used only with caution, if at all. Loppers, also called pruners, and saws are the two most useful tools for brushing. Loppers are the best means of cutting the small woody growth that reappears between clearing sessions. They are safe and effective. The double action anvil type has the most cutting power. Loppers are good for anything up to the size of your thumb. Larger branches are best removed by saw. For brushing, a 21 inch bow saw is generally adequate. The swizzle stick, as mentioned earlier, is excellent for removing new low growth. It is swung like a golf club and can clear a sizable area in a short time. Just remember to keep both hands on the handle, wear heavy boots and long pants, and make sure no one is within twenty feet of you.
Special considerations should be given if the trail adopter chooses to use machetes or safety axes. Although they are capable of cutting fairly large branches swiftly, it is almost impossible to cut flush to the ground and they tend to leave jagged "punji sticks", which are a hazard to hikers. Safety axes also have the nasty habit of losing their blades, which can be hard to find on the forest floor. Be sure to consider these aesthetic and safety issues if you choose to use either a machete or safety axe. For blowdown removal, it is basically a choice between saw and axe. For Wilderness applications, we must remember a saw is powered by the operator; chain saws and other mechanized tools are not allowed, nor appreciated by most hikers on any trails. The extra work entailed in cutting blowdowns by hand is more than compensated by the ease of toting a hand saw and the quality experience of doing the work in a less invasive manner. A 36 inch bow saw is light weight, relatively safe, and will handle most anything an adopter would want to cut by hand. It is not too cumbersome to pack provided it has a blade guard. The primary drawback to the bow saw is its tendency to get hopelessly pinched in large logs. Careful scrutiny of the blowdown before beginning is needed to prevent pinching. The saw cut should be made on the side of the log that will open when the log sags. Often times this is on the bottom of the log which although difficult, is usually possible; and beats the alternative of leaving the blowdown in the middle of the trail with a broken saw blade protruding from it. Axes don't have the pinching problem, and many adopters prefer them over saws. A well sharpened axe in experienced hands can make quick work of the meanest blowdown. The key word is experience. Carelessness leads to footlessness. Until you feel confident with an axe, work slowly and carefully and always have a partner with you. With the exception of the axe, all the tools described here are available in the WODC tool trailer and most can be found in the tool locker at the Ferncroft kiosk. Any tools borrowed from the tool locker should be signed out on the form hanging on the door. By signing this form you are acknowledging responsibility for proper use and care of the tool. Be sure to sign the tool back in when it is returned. The safe and proper use of these tools can only be taught by a hands-on demonstration. If you have any questions on tool use and safety, don't hesitate to contact anyone on the Trails Committee. CLEAN UPA properly cleared trail has a treadway clear of any debris. Cuttings left in the trail have a messy, unnatural appearance and in some cases may linger for years. All cuttings should be removed from the treadway and preferably disposed of in an inconspicuous manner. As previously mentioned, blowdowns should be cut well back from the trail and dragged out of sight if possible. This is a good time to scrutinize the result of your labors and determine if any alternate, unpreferable routes exist. They can be brushed in using cuttings and/or previously downed limbs as discussed in the Special Considerations section of this chapter. When disposing of debris, keep an eye out for drainage channels. Do not place anything where it might block the flow of water. The water may end up in the trail. There is a tendency of trail maintainers to fill in low areas with discarded brush that can dam up runoff and cause major problems. The importance of good drainage cannot be over emphasized. SCHEDULINGHow often you decide to schedule your work trips is up to you, but we do request that you adhere to a few minimal requirements. The most important work trip of the hiking season is the first. The trails take a beating over the winter. Due to wind and snow fall most of the blowdowns occur during this period. It is advisable to plan your first trip to coincide with the final snow melt, which is usually in mid to late May for the higher trails. You may just want to concentrate on blowdowns on this trip. After all, it's been a long winter and you won't want to haul in too many tools on your first hike of the season. This is also a good time to check out the general condition of the trail, including water/mud problems and the state of the drainage structures, which will be discussed in the next chapter. There is nothing like a good spring run-off to test the limits of waterbars and ditches. This is the time to look for problems. Keep in mind that this is also the season when the trail is most delicate and vulnerable to traffic. Tread lightly and if you come across a section of trail that is particularly wet and loose it may be best to postpone any work in this area until drier conditions prevail. Brushing can be done any time of the hiking season. This writer prefers the late summer and early fall. The bugs are mostly gone and seasonal growth has all but ceased. What is removed at this time will remain removed until the growing season starts up the following Spring. The most important thing is to brush the trail thoroughly every year. If you keep on top of it, the work is relatively easy; if you let it get ahead of you, it will feel like there is no catching up. If you can, you may want to do a trip in November, before the snow falls. There is almost always at least one wind and rain storm in the fall that causes some trail damage. Whatever you get on this trip will be work you won't have to do in the Spring and the winter trekkers will thank you for it. This is especially important on the more skiable trails. It is hard to give an estimate of the total time required to keep a trail in good condition. Length, soils, wind exposure and vegetation all fit into the equation. If' you find that your trail needs a greater time commitment than you can afford let the Trails Committee know. We are always willing to work out an agreement that satisfies both the volunteer and maintenance requirements of the trail. Continue to Chapter II
|